Showing posts with label TRICKS. Show all posts

Tuesday, 19 July 2016

How to kick out other devices from a Wifi network

Hello friends! I am here with a new post for you " HOW TO DISCONNECT OTHER DEVICES CONNECTED IN A WIFI NETWORK" .
We can do many things with our android phones. Infact, we can do a little bit of hacking from our smartphones.
So here is a new trick of disconnecting other devices from a wifi network.
Step 1. For running this app on your phone, make sure your phone is connected to your wifi network.
Step 2. Install WiFi Kill android app on your phone.
Step 3. Tap on Play icon and this app will scan all the devices that had connected with your wifi network.
Step 4. When scanning is finished, tap on grab all  and kill all button for kicking out all of your devices from your WiFi network.
Step 5. That’s all, now you can see no one is connected to the internet.

Wednesday, 13 July 2016

All About Malwares


According to Wikipedia, Malware, short for malicious software, is any software used to disrupt computer operations, gather sensitive information, gain access to private computer systems, or display unwanted advertising.Malicious software was called computer virus before the term malware was coined in 1990 by Yisrael Radai.
Malwares are generally used for stealing accounts, passwords and confidential data. Malwares are very dangerous if they get install in our computers or cell phones. Malware can open a backdoor if they enter in our Computer and then an attacker might able to steal confidential information and can do whatever he want.
He can even turn on our webcam or can access to any file or folder.

Generally, malware gets install on our computer or cell phones if we click on any malicious link which redirects us to a malicious website and the malware automatically gets install in our devices.
Spyware or other malware is sometimes found embedded in programs supplied officially by companies, e.g., downloadable from websites, that appear useful or attractive, but may have, for example, additional hidden tracking functionality that gathers marketing statistics. An example of such software, which was described as illegitimate, is the Sony rootkit, a Trojan embedded into CDs sold by Sony, which silently installed and concealed itself on purchasers' computers with the intention of preventing illicit copying; it also reported on users' listening habits, and unintentionally created vulnerabilities that were exploited by unrelated malware.


DIFFERENT TYPES OF MALWARE

    1. Adware:. The least dangerous and most lucrative Malware. Adware displays ads on your computer.
    2. Spyware:. Spyware is software that spies on you, tracking your internet activities in order to send advertising (Adware) back to your system.
    3. Virus: A virus is a contagious program or code that attaches itself to another piece of software, and then reproduces itself when that software is run. Most often this is spread by sharing software or files between computers.
    4. Worm: A program that replicates itself and destroys data and files on the computer. Worms work to “eat” the system operating files and data files until the drive is empty.
    5. Trojan: The most dangerous Malware. Trojans are written with the purpose of discovering your financial information, taking over your computer’s system resources, and in larger systems creating a “denial-of-service attack ” Denial-of-service attack: an attempt to make a machine or network resource unavailable to those attempting to reach it. Example: AOL, Yahoo or your business network becoming unavailable.
    6. Rootkit: This one is likened to the burglar hiding in the attic, waiting to take from you while you are not home. It is the hardest of all Malware to detect and therefore to remove; many experts recommend completely wiping your hard drive and reinstalling everything from scratch. It is designed to permit the other information gathering Malware in to get the identity information from your computer without you realizing anything is going on.
    7. Backdoors: Backdoors are much the same as Trojans or worms, except that they open a “backdoor” onto a computer, providing a network connection for hackers or other Malware to enter or for viruses or SPAM to be sent.
    8. Keyloggers: Records everything you type on your PC in order to glean your log-in names, passwords, and other sensitive information, and send it on to the source of the keylogging program. Many times keyloggers are used by corporations and parents to acquire computer usage information.  
    9. Rogue security software: This one deceives or misleads users. It pretends to be a good program to remove Malware infections, but all the while it is the Malware. Often it will turn off the real Anti-Virus software. The next image shows the typical screen for this Malware program, Antivirus 2010
    10. Ransomware: If you see this screen that warns you that you have been locked out of your computer until you pay for your cybercrimes. Your system is severely infected with a form of Malware called Ransomware. It is not a real notification from the FBI, but, rather an infection of the system itself. Even if you pay to unlock the system, the system is unlocked, but you are not free of it locking you out again. The request for money, usually in the hundreds of dollars is completely fake.
    11. Browser Hijacker:  When your homepage changes to one that looks like those in the images inserted next, you may have been infected with one form or another of a Browser Hijacker. This dangerous Malware will redirect your normal search activity and give you the results the developers want you to see. Its intention is to make money off your web surfing. Using this homepage and not removing the Malware lets the source developers capture your surfing interests. This is especially dangerous when banking or shopping online. These homepages can look harmless, but in every case they allow other more infectious 


How to stay safe from malware

Here are the tips to stay safe from malware:

  1. Install Antivirus/malware software
  2. Keep your software up-to-date
  3. Keep your OS up-to-date
  4. Run scan regularly
  5. Secure your browsing via web antiviruses.
  6. Do not click on links or sites which you don't trust
  7. Do not use Public Wifi
  8. Backup your files
  9. Use strong passwords


HOPE YOU LIKE THIS ARTICLE, SHARE WITH YOUR FRIENDS USING SHARE BUTTONS BELOW. :)


Wednesday, 29 June 2016

HOW TO TRACK YOUR LOST ANDROID PHONE


Track cellphone and tablet


Your Android phones are the most important things in our today's life. It contains all your important contacts and information. If you lose your equipment, you will be losing all those sweet memories with the photos and video. But there is some good news to android phone/tablet users, you can now easily find or at least know where your missing phone is with or without using android application.
Let’s first look at the way of finding your lost phone which doesn’t contain any app installed on it.

Use the IMEI Number

Every android phone carries a unique IMEI number (International Mobile Equipment Identity Number). It will be printed at the back of your device. If you are unable to find the number, you have to launch your phone app and dial the number *#06#. This will give you the IMEI number of your phone. Store this number in a safe place so that it helps you in locating your phone when it is lost.
When you file a complaint, this number has to be added in the report. Your service provider uses this number to track your phone and tell you where it is. No matter if the person using the phone is using a different SIM card or has switched off the phone. Once the device is traced, you can request your service provider to block it from using.
This is one of the easy ways of locating your lost Android phone or tablet.

Plan B

Another way of tracking your lost Android gadget in no time is through Plan B app. This app does not require you to install any recovery software previously but still helps in finding your lost phone. All you need to do is log on to your Google play account. Lookout mobile security offers free software called Plan B. Download the software from play store to your phone. This will be possible only if your phone is within the Internet coverage area. Wait for some time and then send the keyword “locate” without the quotes through SMS to your phone. And a map showing where your equipment is will be sent to your Gmail account. This app is very much useful in situations where you don’t have IMEI number.
If you have installed and configured any of these below android software previously, there is good chance of finding it.
You can log on to Google Play store > My Android Apps, on your computer and check if you have installed any of the following apps previously.

Lookout Security and Antivirus

Lookout is the best android app for security and antivirus. So far, it has received millions of downloads. Just recall if you have installed this on your phone.
If you have activated the option “Missing Device” in this app, it is easy to find your device. If you have also enabled “Signal Flare” option, you can trace the last known location of your android device. This is helpful in case your phone battery is dead or tablet is switched off.
Now sign in Lookout to locate your device. The map shows the location of your phone. If you are at a short distance from the tablet, you can choose Scream option to make a loud noise to find it.

Android Device Manager

Google has recently released a new locator feature for Android gadgets called Android Device manager, which helps its users locate their lost or stolen phones and tablets. It functions in the same way as Lookout and Samsung’s “Find My Mobile”. Here’s how to use Android Device Manager.
Go to the Google Settings app, then select Android device manager. By default the locator feature is activated but to activate remove data wipe, select the box next to “Allow remote factory reset”, then select “activate”.
To use this feature, open the sitehttps://www.google.com/android/devicemanager and sign in to your Google account. You may be prompted for permission to allow Android Device Manager to use location data. Select the Accept tab to continue.
Now you will be provided with a map that shows the location of your device along with other details such as the name of the place, when it was last used and more. The location data doesn’t help you if your phone is misplaced somewhere in your home. Instead of making a call to your phone using other’s phone, you can call your phone directly from Android Device Manager. This will make your device to ring with high volume for 5 minutes, even if it’s in silent or vibrate mode.
One feature that is missing in Android Device Manager is remote locking, which can be useful in preventing a stranger from accessing your data, while you’re tracking its location.
Apart from these, there are other apps such as Android Lost, Where do My Droid and GadgetTrak that help you in finding your lost Android phone/Tablet.
hope you like it.   Don't forget to share and comment. 
FOLLOW ME FARHAN AHMAD.

Tuesday, 28 June 2016

BLACKBERRY SECRET CODES


The blackberry secret codes are used in blackberry phones. There are a lot of codes u can use for your blackberry phones. Some of these are here:

NameDescriptionHow-to
Address Bookdata structure rebuildForces a data structure re-build in the Address BookIn the Address Book, hold "Alt" and press "R", "B", "L", "D".
Address Bookfile verification.Checks the data in your Address Book for inconsistencies.In the Address Book, hold "Alt" and press "V", "A", "L", "D".
Decibel meter.Displays your signal strength in decibels, instead of bars.Hold "Alt" and press "N", "M", "L", "L" (repeat to reverse the effect).
View website source code.Displays the source code of a Web page.In the Browser, hold "Alt" and press "R", "B", "V", "S".
Help Me! menu.Provides crucial technical information about your device.Hold "Alt" and (left) "shift", then press "H".
IMEI display.Displays your device's international mobile equipment identity (IMEI – your serial number) on-screen… Also works from all other GSM handsets.Type "*", "#", "0", "6", "#" on the Home screen.
"Soft" reset.Performs a "soft" reset of your device; the equivalent of doing a "battery pull" (ie. Removing the battery for a few seconds).Press-and-hold "Alt", then press-and-hold (left) "shift", then press-and-hold "Del".
Event Log.Displays event logs of all the system-level events that occur on your device.Hold "Alt" and press "L", "G", "L", "G".
add a category titled "Buyer's Remorse"tell how many hours of phone use and whether there is an ITpolicy on the phone.Go to menu options "Options"
"Device"
"Device and Status Information"
Now type the following letters on the keypad: buyr
All of these secrets have been tested on my BlackBerry 8900;
The above secrets may or may not work on BlackBerry Pearl series handsets.
In some cases, you will need to be on the Home screen when you enter these codes.
Hope it useful ðŸ™‚
Pls share and comment...

Friday, 24 June 2016

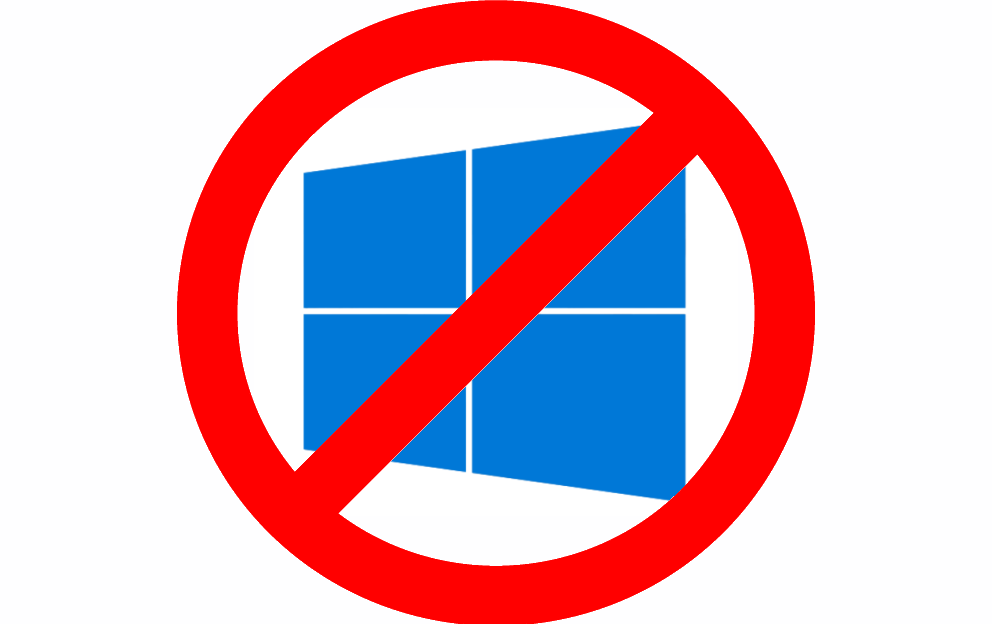
HOW TO DISABLE WINDOWS 10 UPGRADE FOREVER

If you are a Windows 7 or Windows 8.1 user, who don't want to upgrade to Windows 10 now or anytime soon, you might be sick of Microsoft constantly pestering you to upgrade your OS.

Aren't you?

With its goal to deploy Windows 10 on over 1 Billion devices worldwide, Microsoft is becoming more aggressive to convince Windows 7 and 8.1 users to upgrade to its newest operating system, and it is getting harder for users to prevent the OS being installed.


But if you're worried that this out of control Windows 10 upgrade process will force you into downloading an unwanted OS; I have an easier solution to block Windows 10 upgrade on your PCs.

A new free tool, dubbed Never10, provides the user a one-click solution to disable Windows 10 upgrade until the user explicitly gives permission to install Windows 10.

Never10 has been developed by Steve Gibson, the well-known software developer and founder of Gibson Research, which is why the tool is also known as "Gibson's Never10."

How to Disable Windows 10 Upgrade on Your PCs


  1. Go to Gibson's Never10 official site and click on the Download.
  2. Once downloaded, the program detects if the upgrade to Windows 10 is enabled or disabled on your system and then shows a pop-up. If enabled, Click 'Disable Win10 Upgrade' button.
  3. You’ll again see a pop-up that now shows Windows 10 upgrade is disabled on your system, with two buttons to 'Enable Win10 Upgrade' and 'Exit.' Click on Exit button.
disable-windows10-upgrade
That's it, and you have successfully disabled Windows 10 Upgrade on your PC.

Here's the kicker:

The best part of this tool is that you don't have to install an application on your PC to do this. Gibson’s Never 10 is an executable. So you just need to run it, and it doesn’t install anything on your computer. You can delete it when you're done.
"The elegance of this 'Never 10' utility is that it does not install ANY software of its own. It simply and quickly performs the required system editing for its user," Gibson writes on his page about the new utility.
According to Gibson, Never10 will be a great help to inexperienced users while advanced users will likely appreciate the fact that no additional software is installed and will be able to refer their family and friends to this easy-to-use utility.

For more technical details on how this tool works, you can head on to this link.

Unlike other available Windows 10 blocker tools, Never10 blocks the Windows 10 upgrade, but at the same time, the tool allows you to start the update process in case you change your mind, according to Windows watcher Paul Thurrott.

However, the primary purpose of Gibson's Never10 is to prevent Windows 7 and Windows 8.1 operating system from being upgraded to Windows 10. As Gibson says:
"Many users of Windows 7 and 8.1 are happy with their current version of Windows and have no wish to upgrade to Windows 10." 
"There are many reasons for this, but among them is the fact that Windows 10 has become quite controversial due to Microsoft's evolution of their Windows OS platform into a service which, among other things, aggressively monitors and reports on its users' activities."
Moreover, just a month ago, Microsoft was caught displaying unsolicited advertisements on its Windows 10 users' desktops.

These reasons are enough for many users to stay on their previous versions of the Windows operating system.

Tuesday, 21 June 2016

HOW TO HIDE ANY DRIVE USING COMMAND PROMPT IN WINDOWS

Friends!!! Welcome to new post about how to hide/unhide any drive using command prompt. Yes. You looked right!! WE CAN.

  On our personal computer or a laptop, we love to hide our personal data such as photos, videos etc. from the preying eyes of infiltrators. In those circumstances, we mostly prefer to hide a particular folder.But this method is not new and people have become aware of this trick as well and they can now see the hidden folder easily under the menu option provided by the Windows.
So, If in this case, you can hide an entire drive using some simple commands. Yeah! SOUNDS COOL!! Here are some steps to hide/unhide any drive in Windows using command prompt.
           
Hide any drive in Windows using Command Prompt:
To hide any drive in Windows using CMD, follow the steps mentioned ahead. 

For this tutorial purpose and to be on the safer side, I have just created a new volume named ‘F’ and I am going to execute the following commands and see if it’s going to work out.
  • Open command prompt with ‘Run as administrator’ permissions.

  •  Type the command “Diskpart” in your command prompt. If any popup appears then, just press yes and it will open up a new window in your command prompt.

  • Then type list volume and you can see that all the volumes are listed down after your press enter.
    Looking closely, you can see that all the volumes have a volume number like 1, 2, 3, 4 etc. and each volume is assigned a letter such as C, D, E, F etc.

  • Now remember the volume number you want to hide. In my case, I want to hide my newly created volume assigned the letter F and it has volume number 4.
  • Now type select volume 4 and press enter. (Your volume number could be different than mine in this case). Once you’ve selected a volume, you will also get a message.

In the next step, we are going to hide the volume 4 or the volume you have selected in your case. In my case, for volume 4, the letter is ‘F’. In your case, the letter could be C, D, E, F etc.
So, recognize the associated letter with the drive and follow the last steps below:
  • Type remove letter F in our command prompt.
And it’s done. The selected drive has been hidden successfully.
----

So, it works. Now, let’s unhide the same drive.
To unhide any drive in Windows using command prompt, follow the steps below:
  • Close your command prompt and follow the first four steps shown above (until select volume 4).
  • Now, type assign letter F (your drive letter in this case) and then press enter. Now your hidden drive is up and working in no time.

With these commands executed, you can simply hide any drive in Windows using Command prompt to protect your personal and sensitive data.
"If you face any problem in executing these simple commands to hide any drive in Windows using Command prompt, you can let us know in the comments below."

HOW TO INCREASE SECURITY TO WHATSAPP

The hugely popular messaging platform WhatsApp made big news in the security community when they announced earlier this month that they were now providing end-to-end encryption for all of their one billion plus members.
This is an incredibly positive development for privacy advocates. The best part about this new feature is that WhatsApp users did not have to do anything in order to take advantage of this new feature. It is rare that security improvements are this easy.
Even though one need not do anything to take advantage of WhatsApp's new end-to-end encryption, there is a way to make your WhatsApp conversations even more secure when chatting with folks you know personally.
WhatsAppThe problem is this. When exchanging private communications with someone, you can never be 100% certain that the person on the other end of that communication is who they purport to be.
The "last mile" that ensures that you are communicating with the person whom you think you are communicating with requires that you meet that person face-to-face. This is true of all encryption mechanisms.
The first setting that you should enable, therefore, is the one that notifies you if a WhatsApp friend changes their device.
Why would you care about such a setting? Well, because if someone removes the SIM card from your friend’s phone and uses it in another device, they could impersonate your friend on WhatsApp. Enabling a setting in WhatsApp will give you notice that you may be communicating with an imposter.
The way to protect yourself is to go to the “Settings” icon at the bottom right of your WhatsApp screen, open up the Account settings area, and turn on the "Show Security Notifications" setting.
Whatsapp settings
But wait, there’s more!
The next time you are face-to-face with your WhatsApp friend, and you want to increase your WhatsApp security even more, here are the simple steps to do so.
First, make sure that WhatsApp has access to your camera. You may have already allowed this when you installed WhatsApp, but if you did not, it is an easy setting in your Applications area of your phone.
Next, open a conversation with your friend in WhatsApp and then select the person’s name at the top of the conversation. This will open the contact window for that person. Near the bottom of that screen you will see a setting for Encryption.
Whatsapp settings
Tap on the encryption field, and you will be presented with a screen that displays a QR code as well as a 60-digit decimal code that represents the contents of that QR code.
Whatsapp QR code
At the bottom of the QR code screen, there is a link that will enable you to scan your friend’s code, and they can do the same for your code. This is why you need to allow camera access in WhatsApp, even if only temporarily.
That is all there is to it. Now, when you communicate with your friend, you can be more confident that they are who they say they are - although, of course, it's always possible that the person you are speaking to has failed to keep a close eye on their smartphone or has failed to set a strong passcode.
WhatsApp has performed a magnificent feat in bringing end-to-end encryption for all communications to so many people. For those of us who wish to have authenticity when communicating, WhatsApp has gone that extra step to ensure that as well.
Well done, WhatsApp!

Sunday, 6 December 2015

RECOVERY OF LOST PHOTOS FROM SD CARD


HOW TO RECOVER LOST PHOTOS FROM SD CARD


The modern age is epitomised by our daily consumption and creation of digital content. If that includes photos, videos and software, then the question of storage arises - to keep the stuff you want to save.

While the ever-burgeoning and wallet-breaking demands for more and more storage - to keep all the content we want for posterity or easy-access - are not to be ignored, here we concentrate on how to deal with the possibility of data loss, a fate that some would liken to a mugging or even a lobotomy.

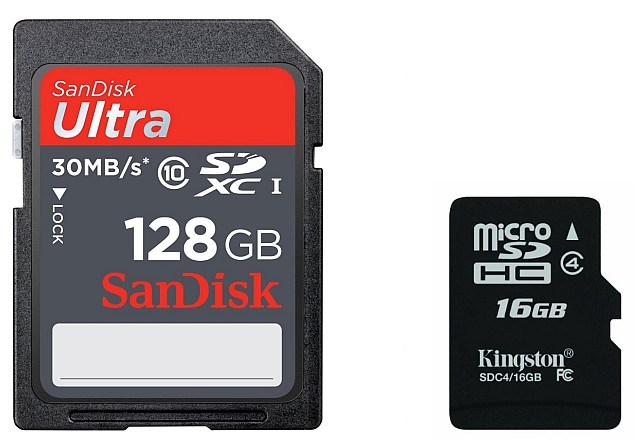
An example of such a painful situation, is the loss of photos from the now-ubiquitous form of flash storage - the SD card, which we all use on our cameras or mobile phones (in the smaller microSD card form).

This article may be a lifesaver for those readers who have managed to accidentally delete their SD card data, or been the victim of the not-as-uncommon-as-we-would-like SD card corruptions.

This is actually not a very big deal, and there are a lot of useful tools online. The Web however, is a veritable minefield of scams and/ or paid data recovery software, designed to either fleece, or steal. This guide teleports the readers to the end of the minefield, safely avoiding the danger, by recommending the free software required to bring back lost data from limbo.

We will be recommending PC software here, to help readers recover data from their SD cards. If after connecting the camera, or mobile phone to a computer, the storage on it is not read like a separate drive, users may be required to remove their SD cards from their cameras or mobile devices, and connect them to their PCs via a memory card reader (a laptop built-in card reader on a will also do the trick, though an microSD to SD card adaptor may be required).

The readers should in any case remove the affected SD cards from their cameras or mobile phones immediately, as there is a chance the device will overwrite the delete/ corrupted files when using the SD card.

It's worth noting that while the focus of this how to is SD cards, all of these software will do a great job of recovering files from any kind of media like your hard drive, external drive, thumb drive etc.

Recuva (for Windows)

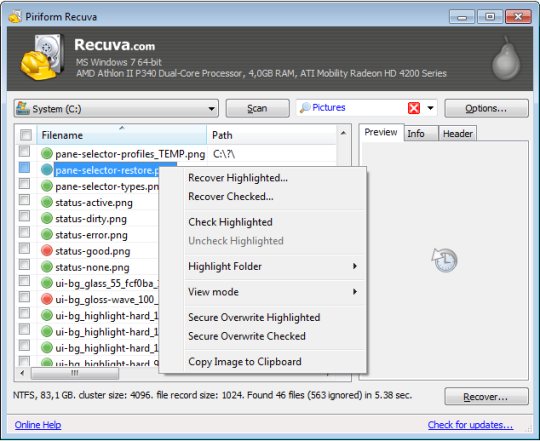
Recuva (version 1.51.1063) is a 4.02MB free download, and works with PCs running Windows 2000 or above. To recover your files from your SD card, load the card on the PC via a card reader, select the corresponding drive in Recuva's drop down menu. Run a scan via the Scan button.

recuva_cnet.jpgThe scan will return a list of files on the card, including deleted or corrupted files, and give you the option the recover the files, using the Recover button.

Pandora Recovery (for Windows)
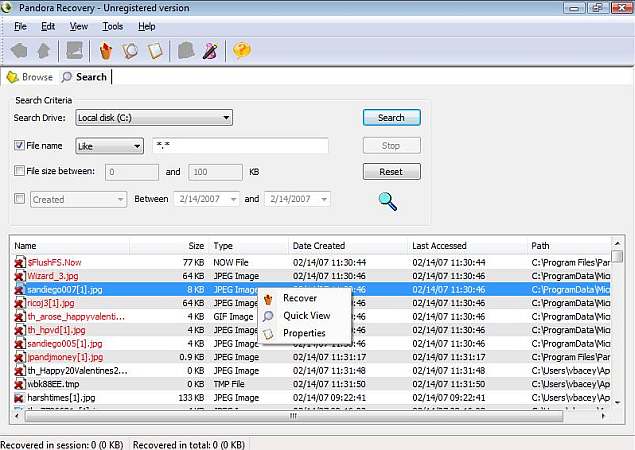
Pandora Recovery (version 2.1.1) is a free-to-use tool that is a 3.12MB download. It supports PCs running Windows XP or above. Just like with Recuva, users will need to load their SD card via a card reader, and perform either a Quick Scan or Deep (Surface) Scan to throw up results of deleted and corrupted files. The second option is for formatted memory, and while it is slower, it should turn up more results than a quick scan.

pandora_recovery_cnet.jpgUsers can then choose which files to recover from the results by right clicking. Alternatively, users can run the Pandora Recovery Wizard and follow on-screen instructions.

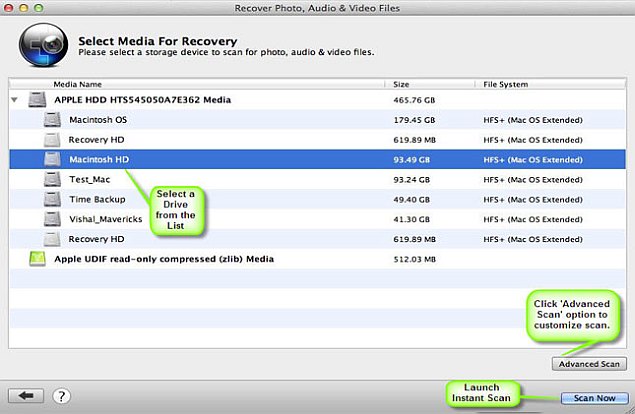
Stellar Phoenix Mac Photo Recovery (for OS X)
The Stellar Phoenix Mac Photo Recovery software (version 6.0) is a 13MB download, and supports Macs running OS X 10.5 or higher. Users will be required to connect their SD cards through a card reader.
stellar_phoenix_mac_photo_recovery.jpg
Users can then select the Recover Photo, Audio & Video option, and then select their drive from the left panel. Thereafter, they can either choose the Scan Now or Advanced Scan (for a custom scan) option. The scan will return a list of recoverable files, from which users can choose which files they want recovered, and then click the Recover button. Users can scan the drive for free and preview the files the software can recover, but undeleting files is a paid option. The software is also available for windows.
PhotoRec (for DOS, Windows 9x or higher, Linux, OS X)
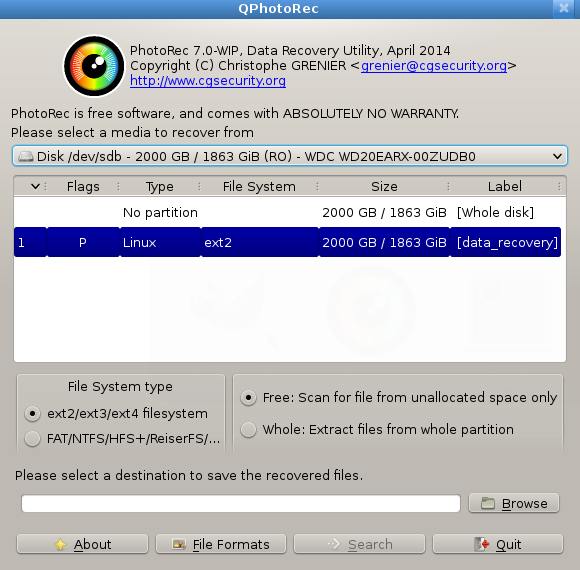
A free, open-source multi-platform data recovery software, PhotoRec (version 7.0 beta) is a 9.4MB download (for Windows 64-bit), and works with PCs running a vast variety of operating systems. It comes bundled with TestDisk, an app for recovering lost partitions. Featuring a very basic text-based UI for older operating systems, PhotoRec also features a GUI-based version for newer ones.
photorec.jpg
In both versions, users will be asked to select the type of file system of the drive, select the relevant drive (after connecting it via a card-reader), and then proceed with Scan option, with the choice of Free (for deleted files) or Whole (for corrupted files). Users can then select the location where recovered files should be saved.
We hope these tools served you well. If you have any suggestions of other data recovery methods you'd like to share with your fellow readers, please let us know via the comments.